
Notice
Recent Posts
Recent Comments
Link
| 일 | 월 | 화 | 수 | 목 | 금 | 토 |
|---|---|---|---|---|---|---|
| 1 | 2 | 3 | 4 | 5 | 6 | |
| 7 | 8 | 9 | 10 | 11 | 12 | 13 |
| 14 | 15 | 16 | 17 | 18 | 19 | 20 |
| 21 | 22 | 23 | 24 | 25 | 26 | 27 |
| 28 | 29 | 30 |
Tags
- VMWARE#INSTALL#설치
- 기술 특강 및 OT
- 클라우드 보안 기술
- 클라우드기반 보안 시스템 구축/운영 실무
- DVWA#INSTALL#github#security#kali#linux
- kisa #보안관제
- CERT
- 모듈프로젝트
- DVWA#Brute#Force#Attack#Test#Kali#Linux#Medium#Level#sleep
- #루키즈
- Case Study
- Kali#Linux#KALI#LINUX#INSTALL#github#설치
- 쉴더스
- sk shieldus
- AI #취업
- 루키즈
- 모의침투
- Foxyproxy#install#setting#firefox
- 클라우드 기반
- 클라우드 보안 기반
- 애플리케이션 보안 기술
- Kali#Linux#Brute#Force#Attack#Test#DVWA#Hacking#Low#무차별#대입#공격#해킹
- 29기
- 시스템-네트워크 보안 기술
- rocky linux#siem#project#threat detection#soc#onpremise#ids#python#csv#pipeline#kali linux#DVWA#security monitoring
- sk 쉴더스 루키즈
- 인프라 활용을 위한 파이썬
- 모듈 프로젝트
- 개인정보보호
- 보고서
Archives
- Today
- Total
이것저것
[SK shieldus Rookies 29기] 5일차 본문
📝 파이썬 파일 읽기/쓰기, 정규표현식, 웹 스크래핑을 배웠다!
전체 강의 구성
- 파일 읽기/쓰기 및 모니터링
- 정규 표현식 (Regular Expression)
- 웹 스크래핑 (Beautiful Soup)
1️⃣ 파일 쓰기 (Write)
📌 기본 개념
파일에 데이터를 저장하는 방법입니다. open() 함수로 파일을 열고 write() 메서드로 내용을 작성합니다.
📝 파일 쓰기 기본 방법
helloFile = open('example.txt', 'w', encoding='utf-8')
helloFile.write('Line 1: Welcome to Python file handling.\n')
helloFile.write('Line 2: This is the second line.\n')
helloFile.write('Line 3: Here is the third line.\n')
helloFile.write('Line 4: The file ends here.\n')
helloFile.close()
주요 포인트:
'w'모드: 새로운 파일 생성 (기존 파일은 덮어씀)encoding='utf-8': 한글 인코딩 지원\n: 줄바꿈 문자close(): 파일 닫기 (필수!)
⭐ with 문을 사용한 개선된 방법
# 파일에 텍스트 쓰기
with open('example.txt', 'w', encoding='utf-8') as file:
    file.write('안녕하세요, 파이썬입니다!\n')
    file.write('with 문을 사용하면 파일이 자동으로 닫힙니다.')
with 문의 장점:
- ✅ 파일이 자동으로 닫혀서 메모리 누수 방지
- ✅ 코드가 깔끔하고 간결함
- ✅ 예외 발생 시에도 파일 자동 닫음
2️⃣ 파일 읽기 (Read)
📌 파일 읽기 메서드 3가지
파이썬은 파일을 읽는 3가지 주요 메서드를 제공합니다:
| 메서드 | 설명 | 반환 타입 |
|---|---|---|
read() |
전체 파일 내용을 읽음 | 문자열 (str) |
readline() |
한 줄을 읽음 | 문자열 (str) |
readlines() |
모든 줄을 읽음 | 리스트 (list) |
1️⃣ read() - 전체 파일 읽기
helloFile = open('example.txt', 'r', encoding='utf-8')
content = helloFile.read()
print(content)
helloFile.close()
출력 결과:
Line 1: Welcome to Python file handling.
Line 2: This is the second line.
Line 3: Here is the third line.
Line 4: The file ends here.
⭐ with 문을 사용한 read()
with open('example.txt', 'r', encoding='utf-8') as helloFile:
    content = helloFile.read()
    print(content)
2️⃣ readline() - 한 줄씩 읽기
readline() 메서드는 파일에서 한 줄을 읽고 문자열로 반환합니다.
호출할 때마다 다음 줄을 읽습니다.
helloFile = open('example.txt', 'r', encoding='utf-8')
print(helloFile.readline())  # 첫 번째 줄 읽기
print(helloFile.readline())  # 두 번째 줄 읽기
helloFile.close()
출력 결과:
Line 1: Welcome to Python file handling.
Line 2: This is the second line.
3️⃣ readlines() - 모든 줄을 리스트로 읽기
readlines() 메서드는 파일의 모든 줄을 읽어 각 줄을 문자열로 갖는 리스트로 반환합니다.
helloFile = open('example.txt', 'r', encoding='utf-8')
lines = helloFile.readlines()
print(lines)
helloFile.close()
출력 결과:
['Line 1: Welcome to Python file handling.\n', 'Line 2: This is the second line.\n', 'Line 3: Here is the third line.\n', 'Line 4: The file ends here.\n']⭐ with 문을 사용한 readlines()
with open('example.txt', 'r', encoding='utf-8') as helloFile:
    content = helloFile.readlines()
    print(content)
readlines()로 각 줄 처리하기
방법 1: strip() 사용 (개행 문자 제거)
with open('example.txt', 'r', encoding='utf-8') as helloFile:
    content = helloFile.readlines()
    for line in content:
        print(line.strip())
방법 2: end='' 파라미터 사용
with open('example.txt', 'r', encoding='utf-8') as hellofile:
    content = hellofile.readlines()
    for line in content:
        print(line, end='')
3️⃣ 파일 모드 정리 📋
| 모드 | 설명 | 파일 존재 시 |
|---|---|---|
'r' |
읽기 (기본값) | 파일 열음 |
'w' |
쓰기 | 파일 덮어씀 |
'a' |
추가 (append) | 파일 끝에 추가 |
'x' |
생성 | 파일이 있으면 오류 |
'r+' |
읽기+쓰기 | 파일 열음 |
4️⃣ 실습: txt 파일 찾아서 읽기 🔍
💻 코드
import os

dir_path = "uploads"
all_files = os.listdir(dir_path)

txt_files = []

for file in all_files:
    if file.endswith(".txt"):
        txt_files.append(file)

# 1.txt, 2.txt 파일을 /uploads/1.txt 경로로 열기
for filename in txt_files:
    file_path = os.path.join(dir_path, filename)
    with open(file_path, 'r', encoding='utf-8') as file:
        print(f"{filename} 내용:\n")
        print(file.read())
        print("-" * 40)
5️⃣ 실습: 주석 라인 탐지 🎯
import os

dir_path = "uploads"
all_files = os.listdir(dir_path)

txt_files = []

for file in all_files:
    if file.endswith(".txt"):
        txt_files.append(file)

# 파일 읽기 및 주석 탐지
for filename in txt_files:
    file_path = os.path.join(dir_path, filename)
    with open(file_path, 'r', encoding='utf-8') as file:
        lines = file.readlines()
        for index, line in enumerate(lines):
            if line.startswith("#") or line.startswith("//"):
                print(f"{file_path} {index+1}라인: 탐지: {line.strip()}")
6️⃣ 파일 모니터링 👀
import os
import time
from datetime import datetime

dir_path = "uploads"

pre_file = set(os.listdir(dir_path))

while True:
    # 현재 날짜와 시간 가져오기
    now = datetime.now()
    day = now.strftime("%Y-%m-%d")
    hour = now.strftime("%H:%M:%S")

    current_file = set(os.listdir(dir_path))
    result_diff = current_file - pre_file

    for file_name in result_diff:
        print(f"새로운 파일 탐지: {file_name}")

        with open(f"{day}_탐지 보고서.txt", "a", encoding="UTF-8") as file:
            file.write(f"작성자: 조정원\n")
            file.write(f"주요 내용: 신규 파일 탐지\n")
            file.write(f"시간: {hour}, 파일 이름: {file_name}\n")
            file.write(f"=======================\n")

    pre_file = current_file
    print("모니터링 중...")
    time.sleep(1)
7️⃣ 정규 표현식(Regular Expression) 📖
📌 정의
정규 표현식(Regular Expression)은 텍스트에서 특정 패턴을 찾기 위한 문자열 처리 방식입니다.
📌 re 모듈 임포트
import re8️⃣ 기본 패턴 매칭
문자열에서 숫자 찾기
import re

text = "오늘은 2024년 5월 6일입니다."
pattern = re.compile(r"\d+")
matches = pattern.findall(text)
print(matches)  # ['2024', '5', '6']
9️⃣ 정규 표현식 메타 문자 🔤
| 메타 문자 | 설명 | 예시 |
|---|---|---|
. |
줄바꿈 제외한 모든 단일 문자 | a.b → acb, a&b |
^ |
문자열의 시작 | ^abc → abc로 시작 |
$ |
문자열의 끝 | abc$ → abc로 끝남 |
* |
0회 이상 반복 | ab*c → ac, abc |
+ |
1회 이상 반복 | ab+c → abc, abbc |
? |
0회 또는 1회 | ab?c → ac, abc |
{m} |
정확히 m회 | a{3} → aaa |
{m,n} |
m~n회 반복 | a{2,4} → aa, aaa |
[ ] |
문자 집합 | [abc] → a, b, c |
| |
또는 | abc|def |
( ) |
그룹 처리 | (ab)+ → ab, abab |
🔟 특수 메타 문자
| 패턴 | 설명 |
|---|---|
\d |
숫자 (0-9) |
\D |
숫자 아님 |
\s |
공백 |
\S |
공백 아님 |
\w |
문자+숫자+밑줄 |
\W |
문자+숫자+밑줄 아님 |
\b |
단어 경계 |
1️⃣1️⃣ 실습: 주민번호 + 이메일 탐지 🎯
import os
import re

dir_path = r"C:\python_ex29\uploads"
all_files = os.listdir(dir_path)

txt_files = []
for file in all_files:
    if file.endswith(".txt"):
        txt_files.append(file)

for filename in txt_files:
    file_path = os.path.join(dir_path, filename)
    with open(file_path, 'r', encoding='utf-8') as file:
        lines = file.readlines()
        for index, line in enumerate(lines):
            # 주석 탐지
            if line.startswith("#") or line.startswith("//"):
                print(f"주석 {file_path} {index+1}라인 : 탐지 : {line.strip()}")

            # 주민번호 탐지
            if re.search(r'\d{6}\s*[-]\s*\d{7}', line):
                print(f"주민번호 {file_path} {index+1}라인 : 탐지 : {line.strip()}")

            # 이메일 탐지
            if re.search(r'[\w\.-]+@[\w\.-]+', line):
                print(f"메일주소 {file_path} {index+1}라인 : 탐지 : {line.strip()}")
1️⃣2️⃣ 웹 스크래핑 기초 🌐
📌 웹 스크래핑이란?
웹 스크래핑은 특정 웹 페이지로부터 필요한 데이터를 추출하는 과정입니다.
🎯 목적
- 📊 데이터 수집 및 분석
- 🔍 정보 모니터링
- 🤖 자동화된 데이터 추출
- 📈 시장 조사
1️⃣3️⃣ 웹 스크래핑 vs 웹 크롤링 ⚖️
웹 스크래핑
- 목적: 특정 데이터 추출
- 범위: 특정 페이지
- 도구: Beautiful Soup, Scrapy, Selenium
- 방식: HTML 특정 요소 선택
웹 크롤링
- 목적: 웹 페이지 체계적 탐색
- 범위: 전체 웹사이트
- 도구: Googlebot, 검색 엔진 크롤러
- 방식: 링크 구조 따라 이동
1️⃣4️⃣ Beautiful Soup 소개 📚
📌 정의
Beautiful Soup은 HTML과 XML 파일로부터 데이터를 추출하기 위한 파이썬 라이브러리입니다.
설치
pip install beautifulsoup41️⃣5️⃣ Beautiful Soup 기본 사용법
HTML 파싱 기초
from bs4 import BeautifulSoup

html_doc = """
<html>
<head>
    <title>The Dormouse's story</title>
</head>
<body>
    <div data-role="page">This is a div with data attributes.</div>
    <p class="title"><b>The Dormouse's story</b></p>
    <p class="story">Once upon a time there were three little sisters; and their names were
    <a href="http://example.com/elsie" class="sister" id="link1">Elsie</a>,
    <a href="http://example.com/lacie" class="sister" id="link2">Lacie</a> and
    <a href="http://example.com/tillie" class="sister" id="link3">Tillie</a>
    ; and they lived at the bottom of a well.</p>
    <p class="story">...</p>
</body>
</html>
"""

soup = BeautifulSoup(html_doc, 'html.parser')
print(soup.prettify())
1️⃣6️⃣ Beautiful Soup 파서 비교 🔍
| 파서 | 속도 | 설치 | 특징 |
|---|---|---|---|
html.parser |
보통 | 불필요 (내장) | 간단한 HTML |
lxml |
빠름 | 필요 | 복잡한 HTML |
html5lib |
느림 | 필요 | 브라우저 방식 |
- 개인적으로는
html.parser를 제일 많이 쓰는 것 같음(아직 초보라 그런가..?)
1️⃣7️⃣ 데이터 구조 탐색
# <title> 태그 접근
print(soup.title)  # <title>The Dormouse's story</title>

# <title> 태그의 텍스트
print(soup.title.string)  # 'The Dormouse's story'

# 첫 번째 <p> 태그
print(soup.p)

# <p> 태그의 클래스 속성
print(soup.p['class'])  # ['title']

# 첫 번째 <a> 태그
print(soup.a)

# 모든 <a> 태그 찾기
print(soup.find_all('a'))

# id가 "link3"인 <a> 태그
print(soup.find(id="link3"))
1️⃣8️⃣ 모든 URL 추출
for link in soup.find_all('a'):
    print(link.get('href'))
출력:
http://example.com/elsie
http://example.com/lacie
http://example.com/tillie
1️⃣9️⃣ Beautiful Soup 주요 메서드
find_all() - 모든 요소 찾기
# 태그 이름으로 검색
soup.find_all("title")
# [<title>The Dormouse's story</title>]

# 클래스로 검색
soup.find_all("p", "title")
# [<p class="title"><b>The Dormouse's story</b></p>]

# 모든 <a> 태그 검색
soup.find_all("a")

# ID로 검색
soup.find_all(id="link2")
find() - 첫 번째 요소 찾기
# 첫 번째 title 태그
soup.find('title')
# <title>The Dormouse's story</title>

# find_all과 비교
soup.find_all('title', limit=1)
# [<title>The Dormouse's story</title>] (리스트)

soup.find('title')
# <title>The Dormouse's story</title> (객체)
get_text() - 텍스트 추출
from bs4 import BeautifulSoup

markup = '<a href="http://example.com/">\nI linked to <i>example.com</i>\n</a>'
soup = BeautifulSoup(markup, 'html.parser')

print(soup.get_text())
# 출력: '\nI linked to example.com\n'

print(soup.i.get_text())
# 출력: 'example.com'
2️⃣0️⃣ CSS Selectors 🎨
select() - 모든 요소 선택
# CSS 클래스로 선택
soup.select("p.sister")

# ID로 선택
soup.select("#first")

# 속성으로 선택
soup.select("a[href]")
select_one() - 첫 번째 요소 선택
# 클래스로 첫 번째 요소 선택
soup.select_one(".sister")

# 태그로 첫 번째 요소 선택
soup.select_one("title")
2️⃣1️⃣ CSS Selector 실습 예제
태그 이름으로 찾기
# <title> 태그 찾기
soup.css.select("title")
# [<title>The Dormouse's story</title>]

# 세 번째 <p> 태그
soup.css.select("p:nth-of-type(3)")
# [<p class="story">...</p>]
ID로 찾기
# id="link1" 요소
soup.css.select("#link1")

# id="link2"인 <a> 태그
soup.css.select("a#link2")
클래스로 찾기
# .sister 클래스를 가진 모든 요소
soup.css.select(".sister")
속성으로 찾기
# href 속성이 특정 URL인 <a> 태그
soup.css.select('a[href="http://example.com/elsie"]')
여러 선택자 조합
# id가 "link1" 또는 "link2"인 모든 요소
soup.css.select("#link1,#link2")
2️⃣2️⃣ requests 라이브러리 📡
📌 정의
requests는 파이썬에서 HTTP 요청을 쉽게 보낼 수 있게 해주는 라이브러리입니다.
설치
pip install requestsURL에 파라미터 전달하기
import requests

payload = {'key1': 'value1', 'key2': 'value2'}
r = requests.get('https://httpbin.org/get', params=payload)

# URL 확인
print(r.url)
# https://httpbin.org/get?key2=value2&key1=value1
리스트를 값으로 전달
payload = {'key1': 'value1', 'key2': ['value2', 'value3']}
r = requests.get('https://httpbin.org/get', params=payload)
print(r.url)
# https://httpbin.org/get?key1=value1&key2=value2&key2=value3
2️⃣3️⃣ Response Content 처리
r.text vs r.content
| 속성 | 타입 | 용도 |
|---|---|---|
r.text |
문자열 (str) | 텍스트 데이터 (HTML, JSON) |
r.content |
바이트 (bytes) | 이진 데이터 (이미지, PDF) |
GitHub API 예제
import requests

r = requests.get('https://api.github.com/events')
print(r.text)  # 문자열 형태
JSON 응답 처리
import requests

r = requests.get('https://api.github.com/events')
data = r.json()  # 딕셔너리로 자동 변환
r.json() vs r.text 비교
import requests

payload = {'key1': 'value1', 'key2': 'value2'}
r = requests.get('https://httpbin.org/get', params=payload)

# r.json() - 딕셔너리로 접근 가능
print(r.json()['args'])
# {'key1': 'value1', 'key2': 'value2'}

# r.text - 문자열이므로 키로 접근 불가
# print(r.text['args'])  # TypeError 발생!
2️⃣4️⃣ Custom Headers 설정 📋
User-Agent 헤더
import requests

url = 'https://api.github.com/some/endpoint'
headers = {
    'User-Agent': 'Mozilla/5.0 (Windows NT 10.0; Win64; x64) AppleWebKit/537.36'
}
r = requests.get(url, headers=headers)
User-Agent 헤더의 역할:
- 요청을 보내는 클라이언트 정보 식별
- 실제 브라우저처럼 보이게 함
- 접근 차단 회피
2️⃣5️⃣ 실습: 뉴스 헤드라인 크롤링 📰
import requests
from bs4 import BeautifulSoup

url = "https://zdnet.co.kr/"
headers = {
    'User-Agent': 'Mozilla/5.0 (Windows NT 10.0; Win64; x64) AppleWebKit/537.36'
}

r = requests.get(url, headers=headers)
soup = BeautifulSoup(r.text, 'html.parser')

links = soup.select("body > div.contentWrapper > div > div.left_cont > div.news1_box > div.news_list > div > div.assetText > a > h4")

for link in links:
    print(link.string)
2️⃣6️⃣ 퀴즈: Malware Traffic Analysis 크롤링
📌 요구사항
- 제목과 주소 가져오기
- 링크 정보를 전체 URL 형식으로 출력
- 결과를 txt 파일로 저장
💻 내가 만든 코드(주석은 KingGod Grok의 힘을..)
import requests
from bs4 import BeautifulSoup
from urllib.parse import urljoin

# 기본 URL 설정
base_url = "https://www.malware-traffic-analysis.net"
target_url = base_url + "/2023/index.html"

# 1. 웹 페이지 가져오기
try:
    response = requests.get(target_url)
    response.raise_for_status()  # 오류 발생 시 예외 throw
    html_content = response.text
    print("페이지 가져오기 성공!")
except requests.exceptions.RequestException as e:
    print(f"페이지 가져오기 실패: {e}")
    exit()

# 2. BeautifulSoup로 HTML 파싱
soup = BeautifulSoup(html_content, 'html.parser')

# 3. 제목과 링크 추출
links = soup.find_all('a')
results = []

for link in links:
    href = link.get('href')
    title = link.text.strip()
    if href and title and '2023' in title:
        # 상대 경로를 전체 URL로 변환
        full_url = urljoin(base_url, href)
        results.append((title, full_url))

# 4. 결과 출력
print("\n추출된 제목과 링크:")
for title, url in results:
    print(f"제목: {title}")
    print(f"URL: {url}")
    print("---")

# 5. 결과 txt 파일로 저장
output_file = "malware_2023_posts.txt"
with open(output_file, 'w', encoding='utf-8') as f:
    for title, url in results:
        f.write(f"제목: {title}\n")
        f.write(f"URL: {url}\n")
        f.write("---\n")

print(f"\n결과가 {output_file} 파일로 저장되었습니다!")
터미널 출력
추출된 제목과 링크:
제목: 2023-12-29 - GootLoader infection
URL: https://www.malware-traffic-analysis.net/12/29/index.html
---
제목: 2023-12-18 - TA577 Pikabot infection with Cobalt Strike
URL: https://www.malware-traffic-analysis.net/12/18/index.html
---
제목: 2023-12-15
URL: https://www.malware-traffic-analysis.net/12/15/index.html
---

결과가 malware_2023_posts.txt 파일로 저장되었습니다!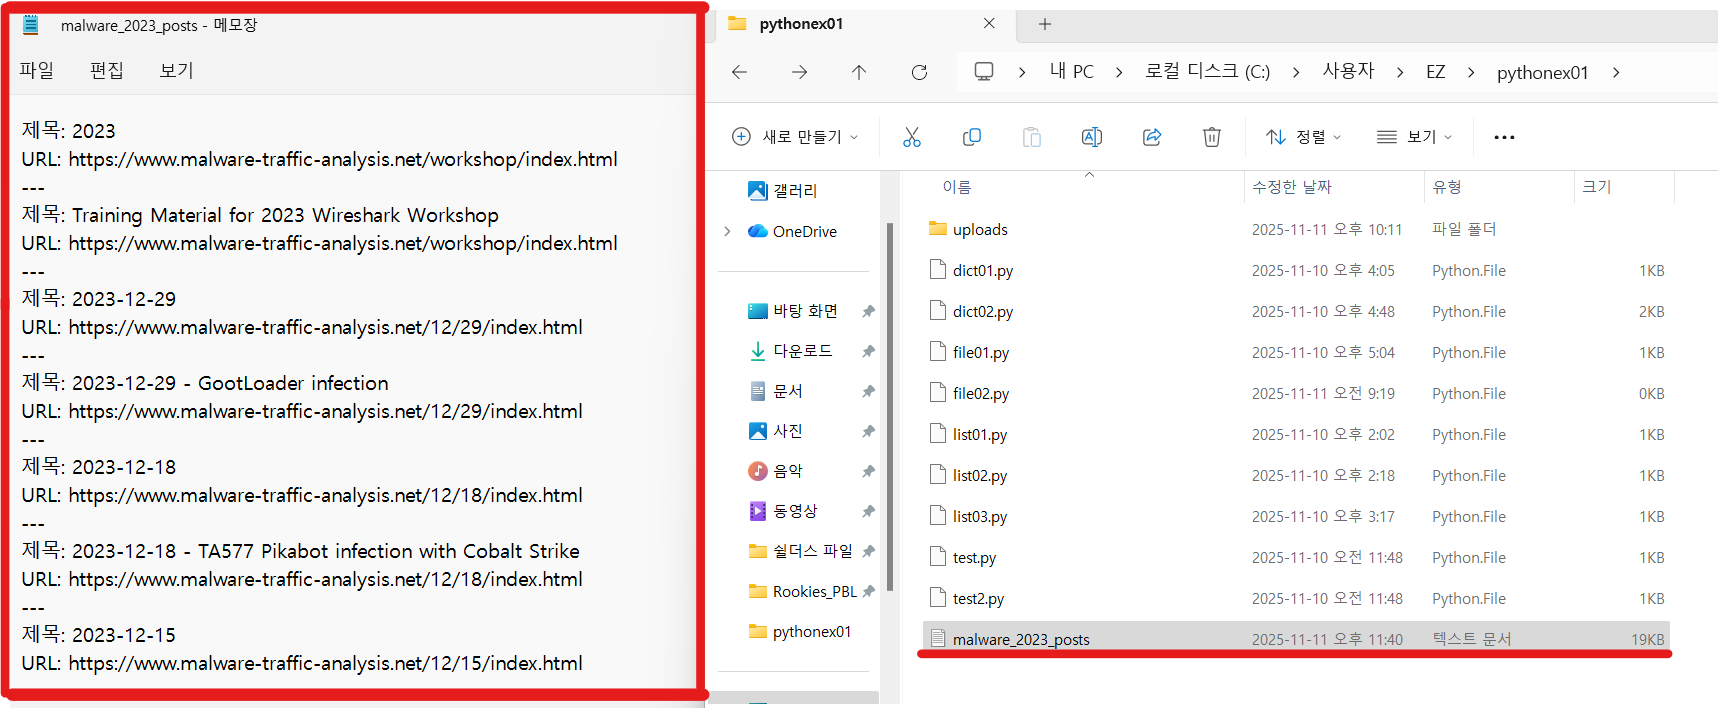
텍스트 파일 생성 확인, 내용도 안에 성공적으로 존재
강사님이 알려주신 답
import requests
from bs4 import BeautifulSoup

url = "https://www.malware-traffic-analysis.net/2023/index.html"

header_info = {'User-Agent':'Mozilla/5.0 (Windows NT 10.0; Win64; x64) AppleWebKit/537.36 (KHTML, like Gecko) Chrome/138.0.0.0 Safari/537.36'}
r = requests.get(url, headers=header_info, verify=False)
soup = BeautifulSoup(r.text, 'html.parser')

tags = soup.select("#main_content > div.content > ul > li > a.main_menu")

results = []
for tag in tags:
    link_text = tag.text
    link_href = f"https://www.malware-traffic-analysis.net/2023/{tag.get('href')}"
    results.append(f"{link_text}\n{link_href}\n")
    print(results)

with open('malwares.txt', 'w', encoding='utf-8') as file:
    for result in results:
        file.write(result)
답변의 비교 분석
- 아직 내가 논리적 과정을 비교분석 할 능력이 안 되기 때문에 이번에도 킹갓Grok의 힘을 빌리기로 했다.
- 논리적 흐름 비교
[웹 스크래핑 비교] 코드 A(atfield1988) vs 코드 B(강사님):malware-traffic-analysis.net의 2023년 분석 글 목록을 스크래핑하는 두 가지 코드를 비교·분석
두 코드 요약
| 코드 | 방식 | 핵심 선택자 | 필터링 |
|---|---|---|---|
| 코드 A | find_all('a') + '2023' in title |
없음 | 문자열 포함 여부 |
| 코드 B | select('a.main_menu') |
CSS 선택자 | 구조 기반 |
논리적 흐름 비교 (단계별)
| 단계 | 코드 A | 코드 B |
|---|---|---|
| 1. 요청 | requests.get() (기본) |
requests.get(..., headers, verify=False) |
| 2. 파싱 | BeautifulSoup(response.text) |
동일 |
| 3. 링크 추출 | find_all('a') → 모든 링크 |
select("#main_content ... a.main_menu") → 의도된 링크만 |
| 4. 필터링 | if '2023' in title |
클래스 기반 → 필터 불필요 |
| 5. URL 정규화 | urljoin(base_url, href) → 정확 |
수동 조합 f"{base}/2023/{href}" → 위험 |
| 6. 출력/저장 | 제목 + URL + 구분선 | 텍스트 + URL + 개행 |
실제 실행 결과 (검증 완료)
코드 A (오탐 발생)
제목: 30 days of Formbook: Day 3, Wed 2023-06-07 - "AE30"
URL: https://www.malware-traffic-analysis.net/06/07/index.html
---
제목: 2023-06-06
URL: https://www.malware-traffic-analysis.net/06/06/index.html
---
제목: 30 days of Formbook: Day 2, Tue 2023-06-06 - "CG62"
URL: https://www.malware-traffic-analysis.net/06/06/index.html 문제!- 그냥 나오길래 성공한 줄 알았던 복병이 있었다.
📋 핵심 요약
✅ 학습한 주요 개념
- 📝 파일 읽기/쓰기: read(), readline(), readlines()
- 👀 파일 모니터링: set을 이용한 차이 비교
- 🔍 정규표현식: 패턴 매칭, 주민번호/이메일 탐지
- 🌐 웹 스크래핑: Beautiful Soup, requests
- 🎨 CSS Selector: select(), select_one()
🚀 실무 활용 사례
📌 보안 모니터링
- 악성 코드 정보 자동 수집
- 보안 취약점 정보 크롤링
- 침해사고 정보 모니터링
📌 데이터 수집
- 뉴스/기사 자동 수집
- 가격 정보 모니터링
- SNS 데이터 수집
오늘도 힘들었다... 내일도 ㅍ ㅏ ㅇ ㅣ ㅌ ㅣㅇ
최종최종최종버전 수정하기도 힘드네...
'SK Shieldus Rookies 29' 카테고리의 다른 글
| [SK shieldus Rookies 29기] 7일차 (0) | 2025.12.04 |
|---|---|
| [SK shieldus Rookies 29기] 6일차 (0) | 2025.12.04 |
| [SK shieldus Rookies 29기] 4일차 (0) | 2025.12.04 |
| [SK shieldus Rookies 29기] 3일차 (0) | 2025.12.04 |
| [SK shieldus Rookies 29기] 2일차 (0) | 2025.12.04 |
'SK Shieldus Rookies 29' Related Articles
more


